Brooklyn Bridge Traffic Patterns
Last night I took a walk over the Brooklyn Bridge and did a bit of recording for my Found Rhythms project. While I was planning on getting more footage of the Manhattan skyline to flesh out my other recordings, these light patterns bursting through the girders below were far more entertaining.
Recording and Notation
Found Rhythms
The past couple months I've been putting in time to update and improve some old code I wrote to process these weird videos I've been shooting. The project is an ongoing one - it's about capturing phasing light patterns that are around us all of the time, but often go unnoticed. As a drummer I love watching these blinking light patterns, and have been searching for a way to show them off. The project is called Found Rhythms.
At the center is an alternative field recording tool, which at this point is a C++ based program I wrote in Open Frameworks. The output is both an audio recording of these phasing patterns, and also a visual score of sorts.
Seattle Part 1
Recording
Notation
NYC Part 1
Recording
Notation
Public Radio Tuning Jig
Earlier this month I took on building, tuning and shipping the last 100 Public Radios we had in stock. In all of the chaos of fulfilling our Kickstarter campaign, I never managed to post a clean video of what the tuning process looks like.
You start by scanning the shipping label. The Raspberry, which is part of our little custom tool, then goes into the database and finds that customer's frequency. Then, you scan the barcode on the radio, and then you drop the radio onto the pogo bed to flash the mcu. The beep you hear at the end of the process is when the Pi acts briefly as an FM transmitter, broadcasting a 1K tone over that particular radio's preset station. That way we know it's been tuned properly, and the speaker is fully functional. Lastly, the Pi updates the database in our google doc. Rinse, wash, repeat.


Remembering My Father
Two years ago today my dad passed on. To this day it was the most emotionally rich and challenging time for me. It was beautiful and of course, incredibly sad. I learned so much about life, not just in the last few days he was with us, but in the year and a half leading up to the end.
The summer before he passed he spent a little more than a month in the hospital undergoing treatment for MDS – a type of blood cancer. He underwent days of intense chemotherapy followed by a bone marrow transplant – a dangerous procedure that was intended to begin a chain reaction of the new healthy marrow slowly replacing the cells in his body, averting the downward spiral he seemed to be slipping into. During this time I wrote him the short composition posted above. A meditation for him and myself.
This period for him in the hospital was nerve wracking. Each day we shared his stats with each other: heart rate, cell counts, blood pressure, notes from the attending doctor.. All anxiously anticipating the moment when a clear sign would present itself that the transplant had begun to work.
In the end however, he rebounded fast, and soon was home enjoying home cooked meals sporting much, much shorter hair.
Fall came. My parents moved back home to their house on Long Island. My dad began doing chores around the house and started working again. We all settled back into our lives. His hair grew back. For a good five months, we didn’t think about the long nights in the hospital the summer before. We didn’t think about death.
Winter came and went. In the early Spring he was healthy enough to take a trip, and we all got away for a week to Florida together.
But by the middle of the next summer he started feeling short of breath, and signs of his previous illness began appearing again. The doctors told us not to worry, but then a one time blood transfusion was followed by another, and another.
My parents moved back into the city to be closer to his doctors. Shortly thereafter, a single midnight emergency trip to the hospital became a regular occurrence. A one-day visit turned into a week, and the next time it happened, it turned into almost a six week stay.
I remember when my dad called me to tell me he’d decided to go home, to leave the hospital, to go into hospice care. He’d made the decision to essentially begin the process of letting go and passing on. Inside, I was crushed – it wasn’t real, this couldn’t be happening, we couldn’t be giving up. But, we supported him.
In the course of five days at home our lives changed. We sat by his side, day in and day out. We cooked him real food for the first time in months. We listened to music, shared laughs and stories, and cried a lot. He showed so much grace as he left. It was a gift to all of us - his friends and family. And for my mom, brother, sister, and everyone there, it was a lesson on living, and dying. I miss him. He was the best.
A grainy selfie from a trip to Mexico
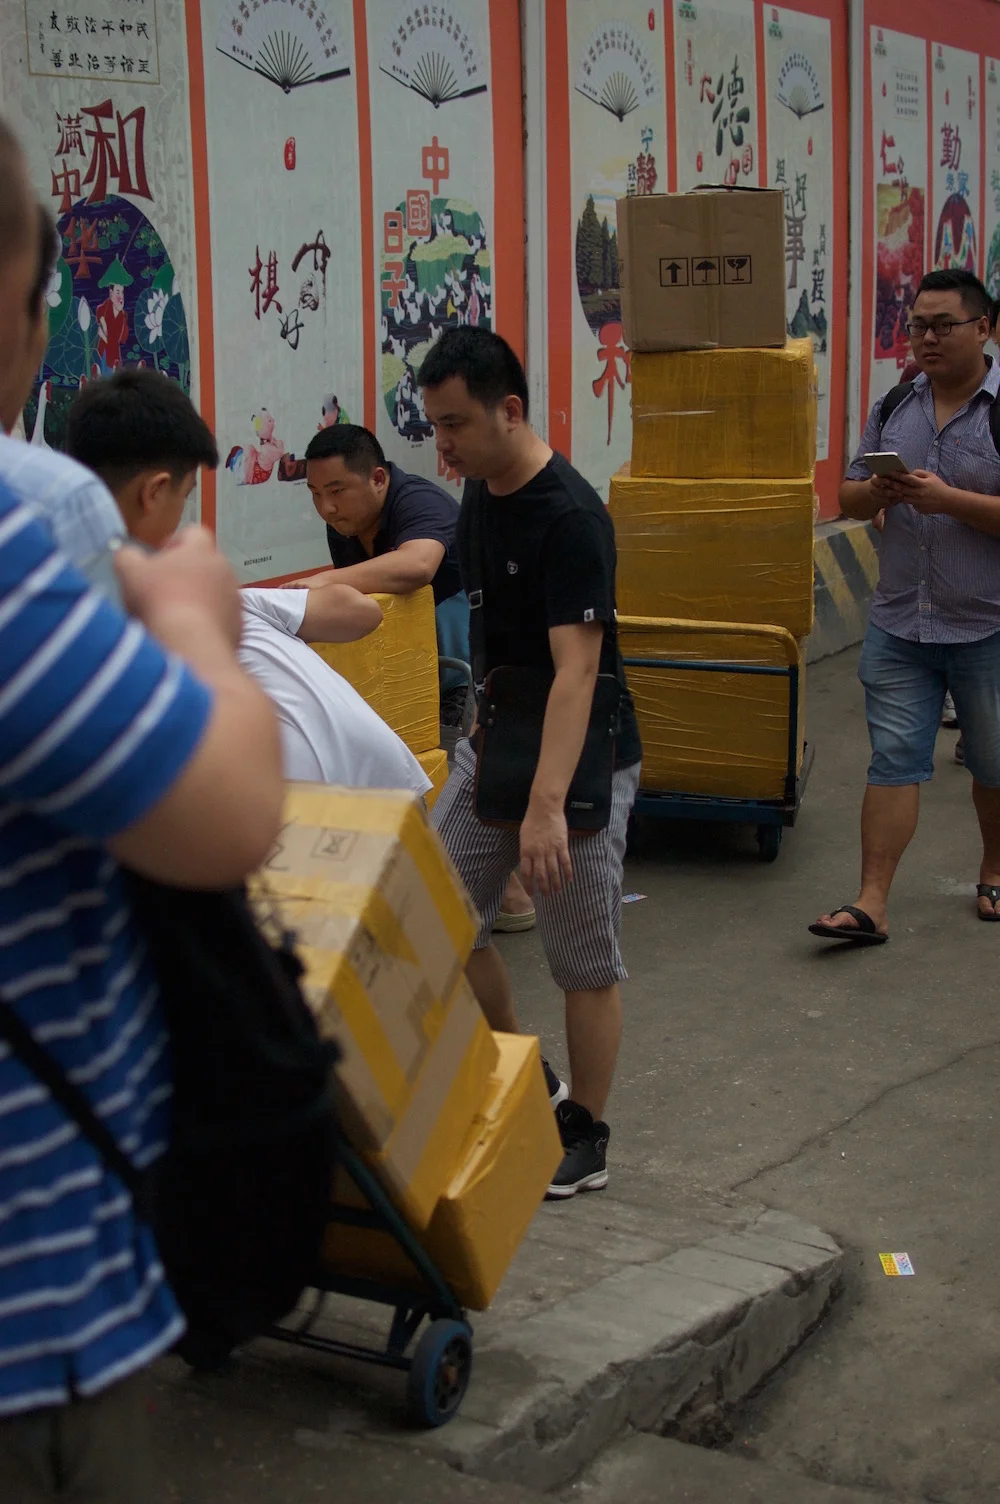
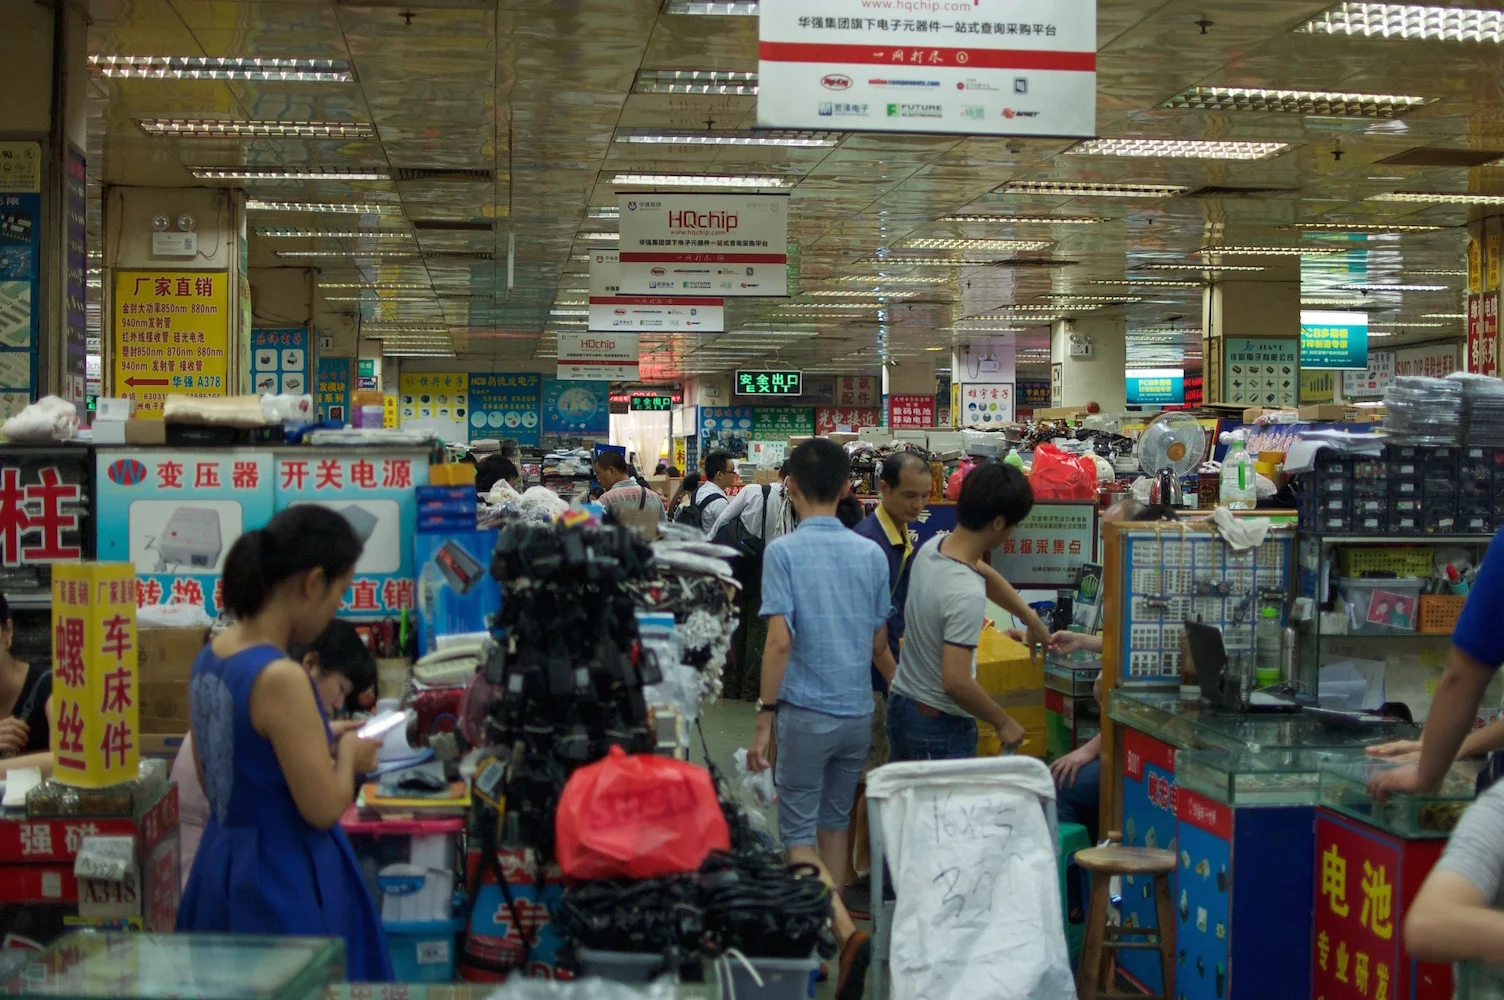
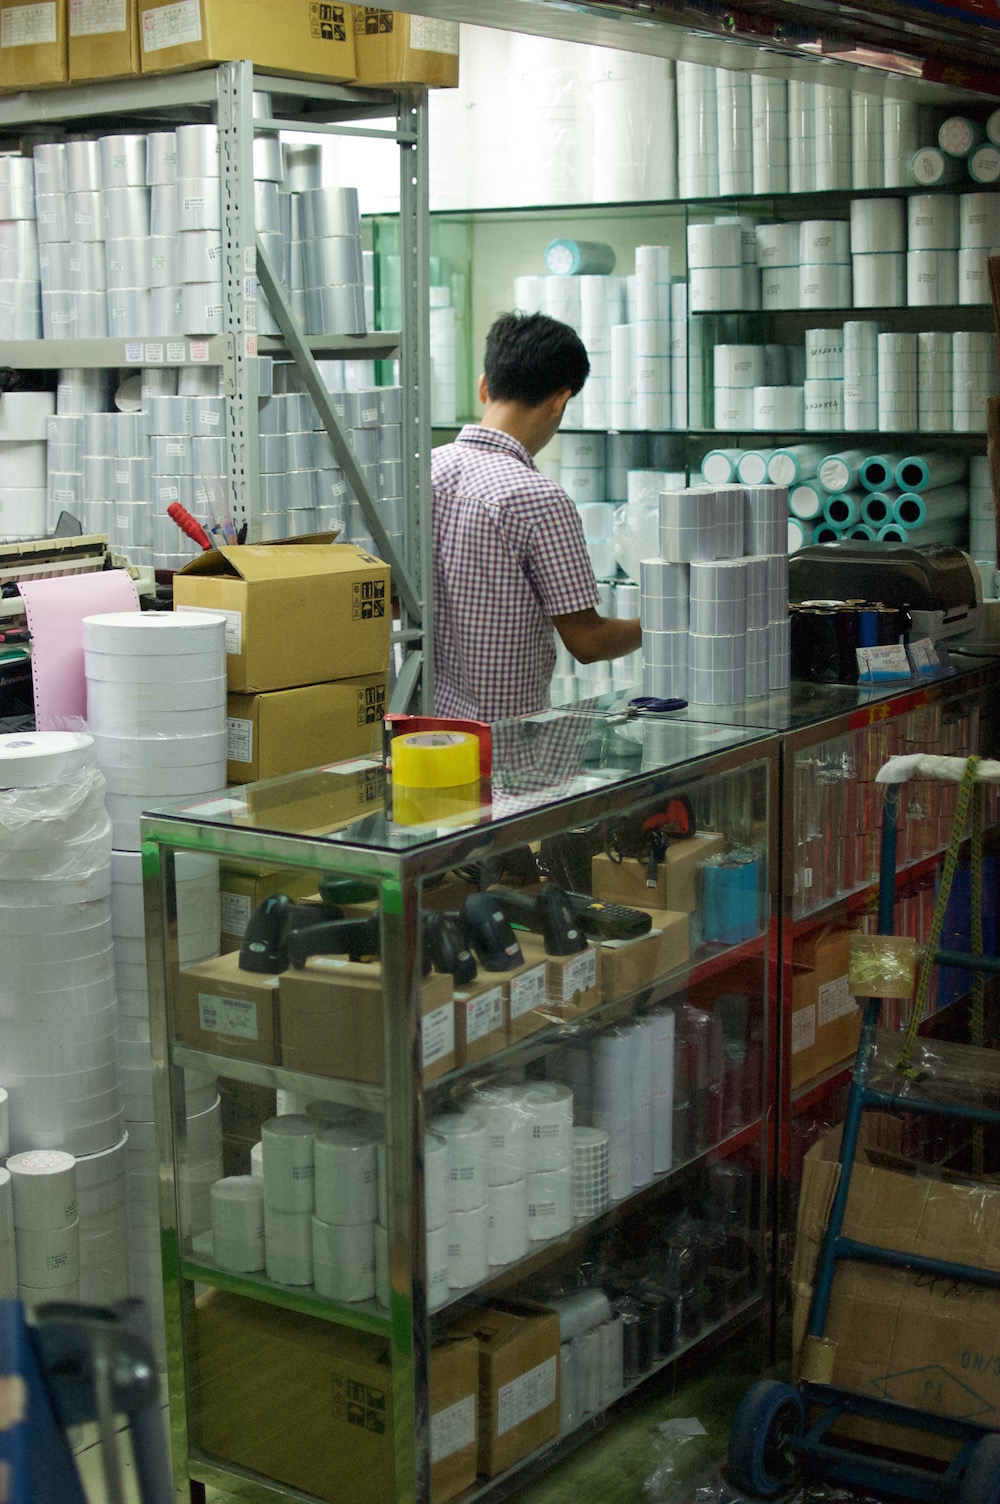
Public Radio In China
Here are some additional photographs accompanying a piece I wrote on Medium about The Public Radio's trip to China last month.


Tools and Tool Making
This past March I was invited to give a talk at the Parish Art Museum in Southampton. The talk was part of the their ongoing Pecha Kucha series - a 20x20 style talk where presenters are allotted time for 20 slides, which automatically change every 20 seconds. It's fun and a bit stressful, but really interesting for the audience. Here's me talking about tools and tool making and the importance of exploration when teaching yourself new technologies. Credit to Zach Lieberman for making this an important part of my time at SFPC.
The Public Radio, Open Books
After a successful Kickstarter campaign, a long winter revising designs, and an even longer spring building radios, here are the stats and financial breakdowns on the Public Radio. Since we're all about open-source, here's to open books. Enjoy!
Being Busy
Last month, The Public Radio was featured in Popular Mechanics. It was super exciting to pick up a copy, flip to page 10 and see our radio listed next to folks like Dyson and Benjamin Moore. Getting recognized in print, regardless of the publication is special. Last month, Jus Post Bellum - a band I've dedicate a lot of time to over the past four years - was given a full page shoutout in the New Yorker. Ironically, the band hasn't been nearly as active lately, and the slant of the article was both an acknowledgment of the group's previous two albums, and also noting the fact that it was heading in the direction of a duo because of the difficulty of finding time as a quartet with all our other personal obligations, and side projects.


These two shoutouts have given me a bit of pause. Over the last year I've turned down grad school, attended a 10 week alternative art/technology residency, launched and fulfilled a Kickstarter campaign (along with Spencer), co-designed and installed a large scale permanent lighting sculpture, got interviewed on CBC and NPR, did sound design for a short film, gave a (brief) talk at the Parish Art Museum, started a new job, and visited some of the Public Radio's manufacturing facilities in China. It's been full, and exciting, but it's also meant that I've been super busy, and as a result have had to let things go.
I've struggled for the past several years with how to fit music into my life. The truth is that it's gradually been replaced by other work and side projects. Part of this was an active decision stemming from working in fields related to music and sound design, but the rest just sort of happened. Looking back over the last seven years there have always been these undulations of personal interests and external opportunities and recognition. Every once and a while these things overlap and something magical happens. Knowing when to move on from one project and onto the next thing can be especially challenging - relationships change, work environments change, etc. I'm happy to have some cut-outs to hold onto :).
Challenges With Small Scale Manufacturing Via Kickstarter, Reflecting on the Public Radio
Over the next three weeks Spencer and I will be building up and shipping out the remainder of our Kickstarter rewards and pre-sale orders — what amounts to roughly 2,100 individually-tuned radios. Our two-person team began down this path about two years ago. What started as a side project increasingly becoming front-and-center in both of our lives.
People frequently ask if we had any idea how much work the project would actually take, and the short answer is definitely “no.” I can think of a few aspects of the project in particular that at one point or another buried us in work, crippled our output, or slowed our fulfillment abilities. Supply chain management is one, minimum order quantities is another, and working with individualized rewards using the current Kickstarter fulfillment tools was a third. And, in one way or another, these all relate to the particular challenges of undertaking small-scale manufacturing via Kickstarter.
The early days on Grand St Beta.
Leading up to the Kickstarter campaign, we worked hard to develop the beta version of our radio, and we generated a decent amount of feedback from our first customers on Grand Street. We knew that there was a fair amount of re-engineering left to do, but we decided to Kickstart between these steps anyway. Kickstarter was to serve primarily as market validation, and we knew that we were taking a gamble; if we funded, or overfunded for that matter, we’d have to reengineer and redesign our radio for manufacturability and quality (our original radio reception was pretty crap). As a two-person team with relatively limited experience in embedded systems and electronics design, our learning curve would be steep to say the least.
It wasn’t a surprise to us when we funded, and it wasn’t even such a surprise when we overfunded either, but the degree to which we all of a sudden had to literally become a business, form an LLC, and handle customer service inquiries, while figuring out how to begin refactoring our design, did come as something of a shock. Ultimately, we were not unique in this — Kickstarter has a way of doing this to projects — but unfortunately, as an electronics and hardware undertaking, we sort of landed in no-man’s-land.
We’d raised enough money to build up our radios, fund a handful of revisions to our designs, and buy ourselves pizza on nights we were working on the project, but not enough to have any real purchasing power with our contract manufacturers. We couldn’t take advantage of the economies of scale we would have benefited from had we 10X overfunded, as the costs per unit (with electronics components especially) fall off precipitously with larger orders.
Fulfillment party #1 !
At the same time, 2,100 radios was about 35 times more than what we’d previously put together by hand, and there was no way we could undertake the entire assembly ourselves. Which is to say that, in order for any of this to work, we’d need to reduce the cost of our own labor to zero and call in big favors from friends. We started doing it for the glory, for the learning, and maybe bragging rights. Whatever it was, we had started something we had to now follow through on.
Luckily for us, Spencer had experience from his previous job working with overseas manufacturers, and had a pretty good idea of the hoops we’d have to jump through. Yet in the end, we still had major issues with certain suppliers. Our speakers, for example, were about two months late delivering, over budget, and required hundreds of email exchanges, and, in the end, the quality was just okay. And that was starting with a product that the manufacturer already had tooling for! When things were going too slowly overseas, we found that we didn’t have any clout or leverage with these factories — we were spending less than $10,000 with each of them — and we couldn’t honestly forecast what future orders would look like in hopes of persuading them to prioritize our order.
Throwing more money at the situation might have helped, but we were really experiencing another problem: we didn’t have any established supply chain that we’d fully vetted. We just didn’t have the time or the resources to do this. Our process was this: find suppliers who can make the thing affordably, on time, and will respond to our emails relatively quickly - bonus if they had reviews or other noteworthy customers, or were willing to provide suggestions along the way.
We went overseas for a handful of components that seemed straightforward enough to take this kind of gamble on. But really, we didn’t have a choice, as our cost of goods would have been through the roof had we not done so. Having parts custom made, like our knob, ended up saving us 80% on that line item alone. For our most important contract manufacturer, the printed circuit board assembly house, we chose to stay local, which was a great decision — there was a ton of back and forth with the factory, and it was crucial to the projects success.
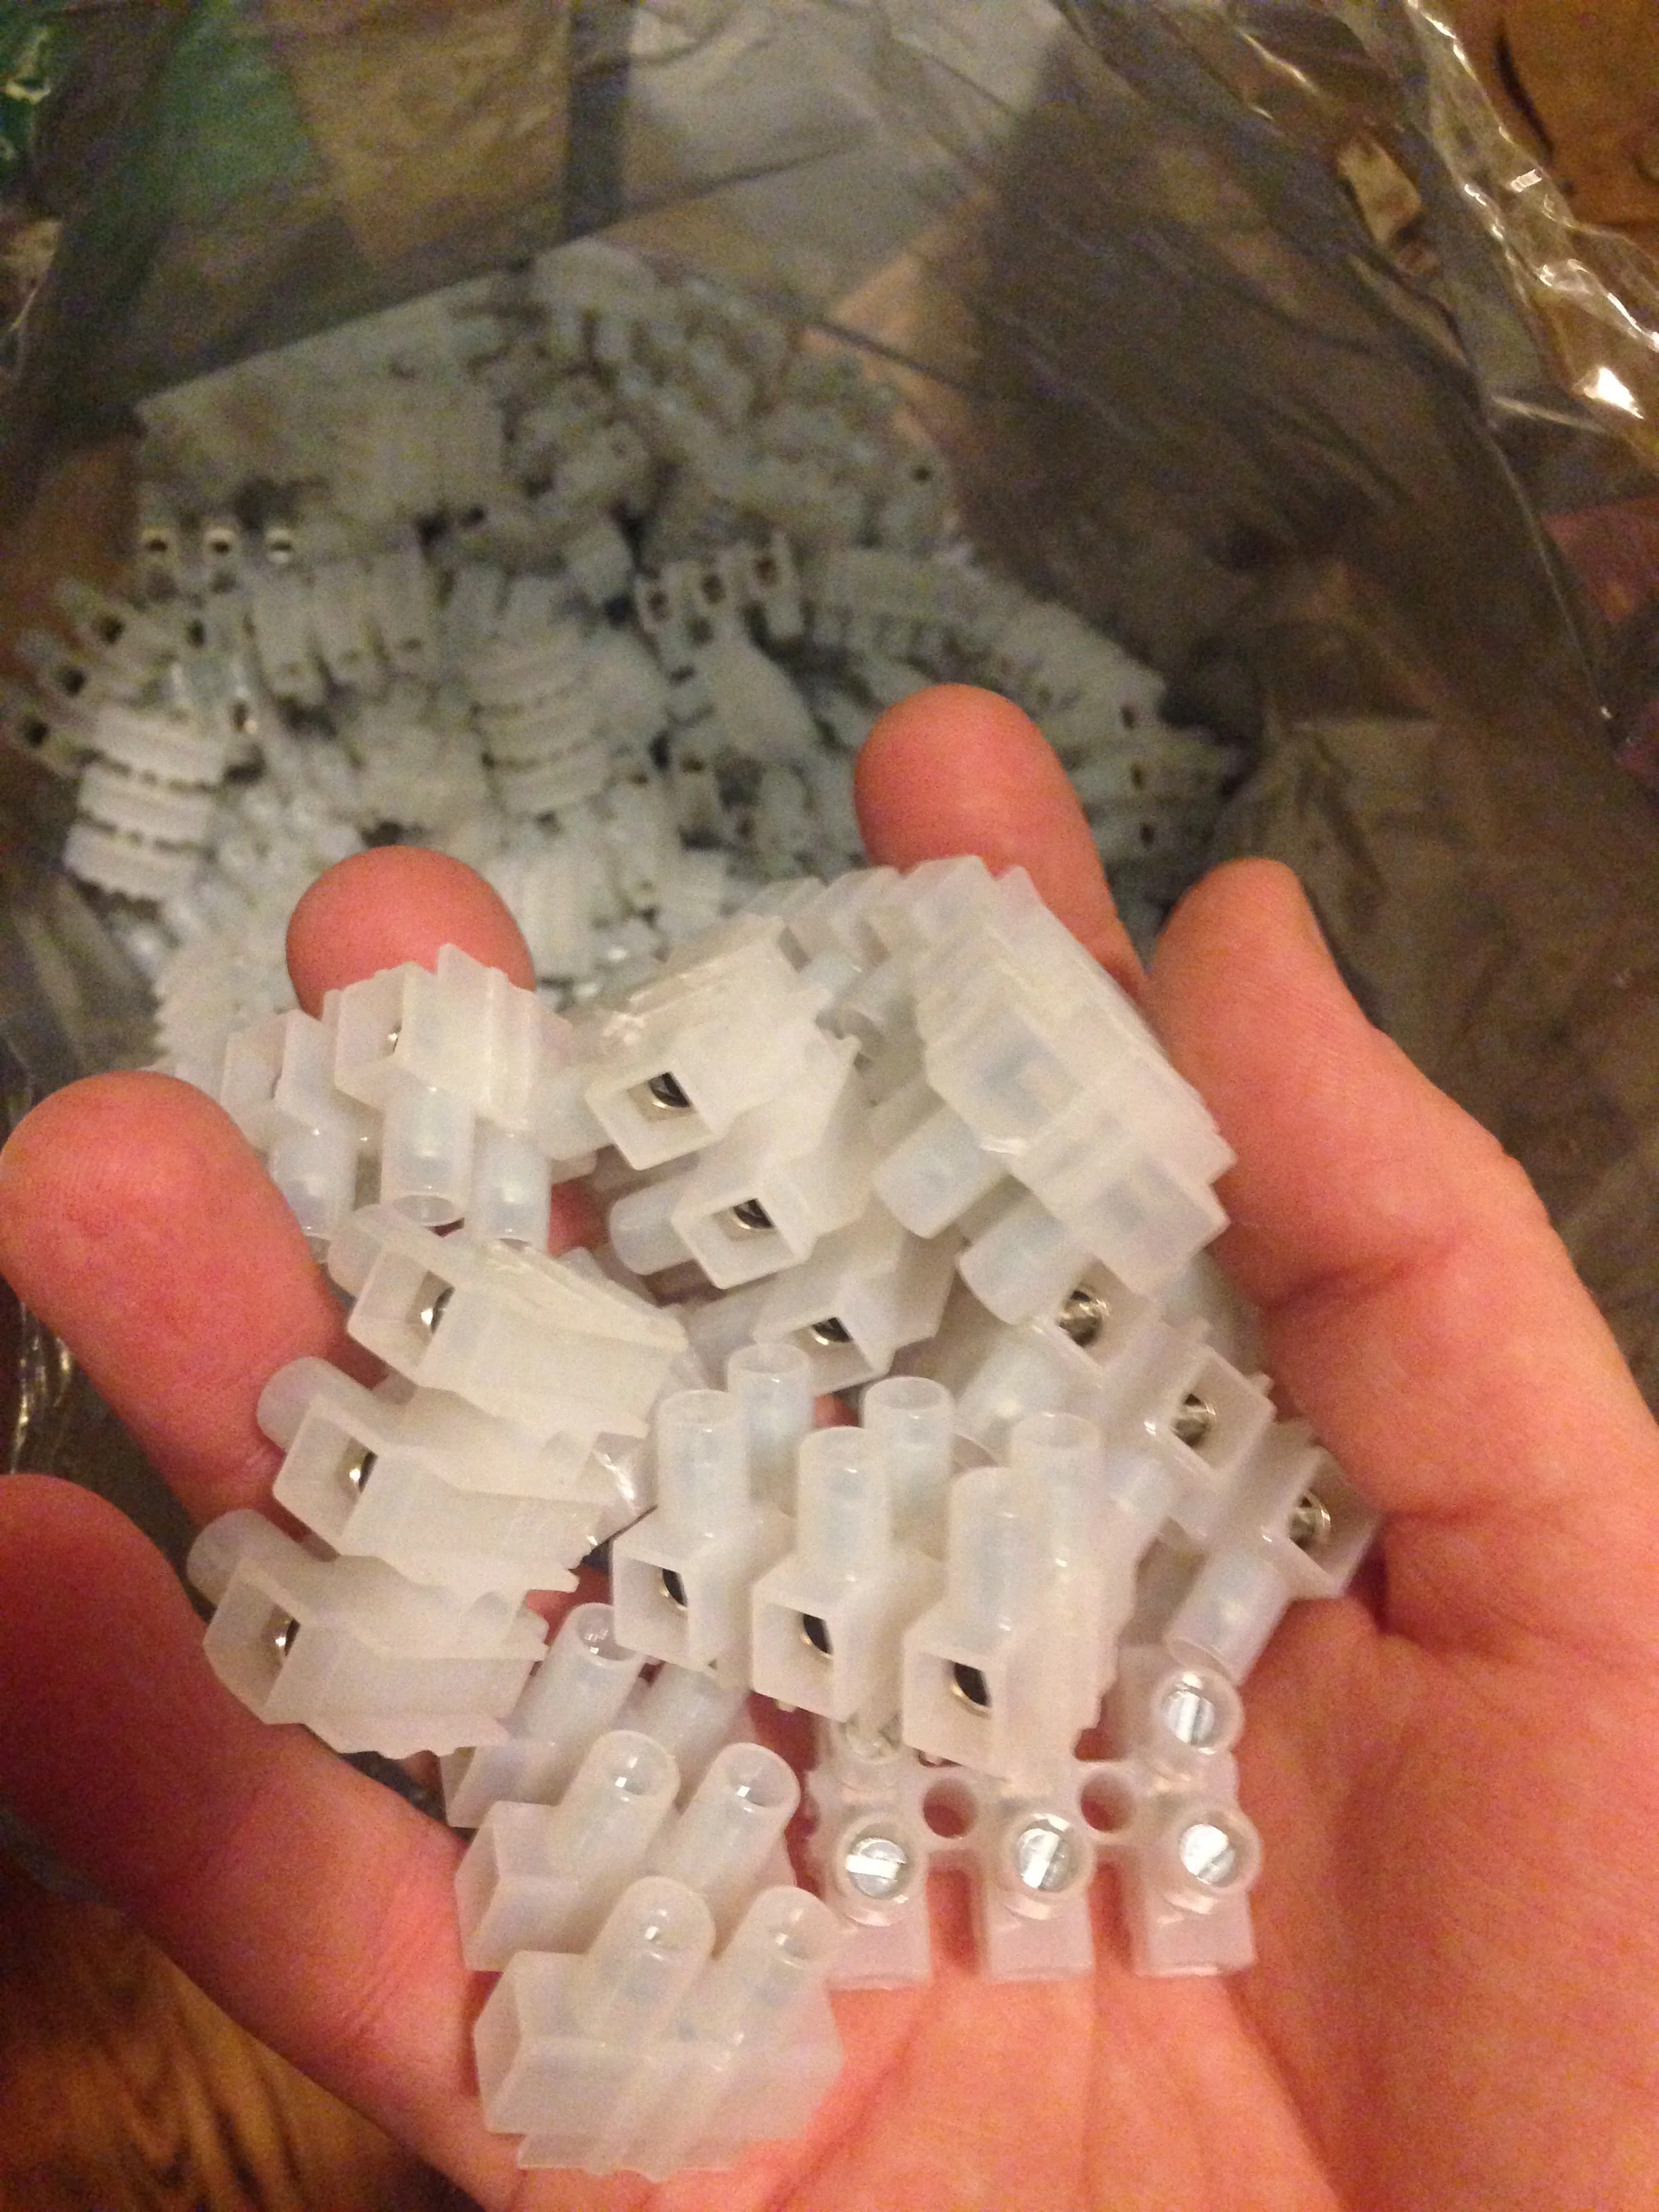
There have been a few other annoying logistics to suss out along the way. Like, where do you store a couple thousand mason jars or pallets worth of shipping boxes from Uline? How do you receive these items if you don’t have a loading dock? Because we didn’t quite have the funds to outsource all of the final assembly, this stuff was up to us to figure out. Our apartment closets are stuffed.
Early motivations brainstorming..
In the end, we started this project to accomplish a few things: add to our portfolios, learn new skills, make something our friends would enjoy or even buy, and have the experience taking on a completable project. We have learned a tremendous amount along the way: everything from which packaging tape works best to why class D amplifiers don’t play well with RF projects. And in that regard alone, our project has been a huge success.
It’s interesting to note that as more and more ‘maker’ tools are developed, and the barrier of entry to developing hardware projects gets lower, the level of risk project creators take on is not necessarily following the same trend. This kind of hacking>honing>kickstarting workflow can lead to trouble. In our case, if we hadn’t been working on The Public Radio pretty much constantly over the past 8 months, we’d be much more than two weeks late in delivering and much less than just breaking even with funds.
Aside from planning on nothing but sheer dedication to your project full time, my bit of advice on Kickstarting a small scale hardware project is to be careful how hard you push to overfund. Chances are you might get more than you bargained for, and will have plenty of late nights ahead. If you’re going to swing hard, swing really really hard — and know where that next manufacturing plateau is.
Public Radio's Testing & Fulfillment Planning
Recently, the work on the Public Radio has shifted into organizing ourselves in preparation for fulfillment (..Finally!) However, shipping 1600+ radios over the next 4 weeks, all tuned to unique frequencies is an interesting problem, and we’ve spent a little while thinking about the ways to best tackle this last stage of the project, namely in regards to accuracy, cost, and speed.
Our approach has been to merge the radio’s electrical test, and flashing of the firmware with our shipping data and serial numbers. Some early idea generation was:

Yea.. not the best handwriting :)
And now here’s basically what that looks like in slightly different approach in real time.
There's still a ton of RF interference when using the rig at my desk, so the programmed radio has quite of bit of static.
To back up a bit though, our challenge is to match a backer name and shipping address with a desired FM frequency and radio serial number. So in the end for example, we know that John Smith has radio # 0001, tuned to 88.3, shipping to ‘some address’. This wouldn’t be so hard, except that we’re working across a couple databases.
What Kickstarter provides creators with, is a CSV formatted according to the questions posed in the *one* survey they're allowed to send to backers. In hind sight, I would have formatted all of my questions differently - in a more standardized approach so that integrating with address books, and 3rd party shipping services were a bit easier.
Somewhat of a mess.. Check out the "pick one for me" response in the frequency field :)
So, we’ve invested in a couple tools for this. We have an test bed PCB we designed, connected to a Raspberry Pi, the meat of which is an over-current comparator circuit that flags boards which have shorts, as well as connections to an AVR programmer to actually flash the radios, an external speaker, and some LEDs to indicate pass/fail status.
This board will end up being revised due to some clearance issues with the various ribbon cables, and header spacings.
Additionally, we picked up a barcode scanner and thermal printer. The scanner is basically plug and play - scan a barcode, it emits a string of characters - and the thermal printer is as well. To boot, we’ve gotten ourselves an account with stamps.com to be able to print USPS postage. This all saves us a considerable amount of money.


The challenging part is that we want to do a couple of things at the same time in this last step, and it means merging our pretty messy backer data with Endicia or stamps.com (they're the same company, actually). Additionally, Endicia wants to import data via your address book, which has it's own formatting, so it's a little bit of a pain. Then if you want to export your Endicia data, it wants to spit out an XML file or some other format, not a simply a csv.. It's just a little harder than it all should be, and meanwhile you're crossing your fingers you didn't lop off 20 names in the process.
With all of that sorted out, we end up with a database in Endicia, which provides just enough fields to include FM Frequency, Serial #, and Campaign, in addition to shipping info. So the pre-production process becomes:
- Move all backer data into Endicia
- Print out shipping labels for all verified addresses
- Print out barcodes for all radios to be shipped
- Pull down Endicia report / csv / XML file (this becomes our master list)
At this point we have two barcodes our scanner can read, one which relates to the radio's serial number and one which relates to the backer's shipping data. Using a bash script we've been pulling together this week, and command line tools like 'grep' and 'sed', we can search our Endicia database for the tracking number, find the backer's FM Frequency on that same line, and later append data to that line. So the next step in the production process becomes:
- Execute the bash script
- Scan the shipping label
- Search the database for the line that has that unique tracking #
- Pull out the corresponding frequency and store as a variable
- Scan the radio's serial # barcode
- Store that as a variable
- Run the electrical test
- If passed, program the radio with the backer's frequency
- Append the Endicia csv with the backer's radio serial #
Phew, a mouth full. In the end we'll hopefully be left with a document that has everyone's tracking info, station frequency, and radio serial number that we can match up with Kickstarter's online database for the project, and end up with smiles and boxes of radios.
The whole process though, has made me think a lot about ways to improve on Kickstarter fulfillment. A wish list of creator tools if you will.
- Shipping estimates
- Etsy is doing it.. I haven't spoken to anyone who's used it yet, but it would be such a nice thing to have next time around. We decided on a shipping cost by essentially averaging the cost of radios we'd previously sent across the country in our beta round. But our shipping costs make up 25% of our cost-of-goods-sold - that's a huge!! number to be guessing on.
- More than one backer survey
- We struggled with this one. We decided to essentially vet our 'Maker Kit' backers to be sure they knew what they were in for, asking questions like "Do you own a soldering iron?" But this meant we also had to ask for their shipping addresses then as well. Some of our reward tiers coincidentally were for kits AND assembled radios which meant some folks weren't given the option of opting out of the kit, they just received the first and only survey for shipping address and frequency.
- Shipping data that is more easily integrated into self-fulfillment services.
- As more people run medium sized successful campaigns, hand writing labels or doing post office runs isn't feasible, though the financials rarely work out to make third party fulfillment services that attractive either. With a more integrated process, it would be easier for people to pick up a thermal printer and do those steps themselves.


Sneak Peek, AF595
This project wrapped up last month, after being roughly ten months in the works. We're planning a formal announcement soon, but in the meantime here are a few pictures. Electronics design, modeling, assembly, and installation by yours truly, in collaboration with Studio Indefinit.


PCBA Factory Tour @ WAi
Yesterday Spencer and I drove to South Deerfield, MA and visited Worthington Assemblies - the printed circuit board assembly house who will be soldering together 2,500 circuit boards for the Public Radio over the next 6-8 weeks. Chris Denny - the CTO - gave us a tour of the production floor, which was really awesome. It was the second time I'd visited an assembly house, and a lot of the workflow is still new to me so it was great seeing it first hand.
The entire space is configured around the production line, parts and boards are received at one end and inspection and shipping is at the opposite side of the room with the pick and place machine, main conveyor, and oven in the middle.
Everyone on the floor wears these blue anti-static vests, metal bracelets, and funny shoe straps to ground their bodies while handling electronics. Additionally, the floor gets a coat of conductive wax once a month to allow any static voltages to pass through to the real ground.

As WAi receives shipments from suppliers, a thermal printer spits out barcodes for reels of parts and panels of pcbs, which are then accounted for in an in-house inventory system and shelved until they're ready to be assembled.

Next, parts get placed in a kit according to the number of boards they'll be assembling that day, and reels of components are loaded onto the feeders for the pick and place machine.
Depending on the number of boards being assembled and the pitch and complexity of SMT footprints, a manual or automated solder paste machine is used to align the stencil and roll on a layer of solder. The automated version is pretty neat, it aligns the pcb with the stencil using a camera, and is accurate to within 8 microns!
WAi has two pick and place machines - one that they use for small runs and odd jobs, which is physically located off of the conveyor belt line, and another which is located just after the automated solder dispenser.
Chris showed us the inside of one of them which has two main heads that pick and place the components using a fancy vacuum nozzle, and a set of claws which align the component to the center of the nozzle. There's also a secondary head which can grab and align six or so components at the same time.
The last machine on the line is the oven, which is essentially a really, really fancy oven. You input the weight and dimensions of the PCBs and it calculates the thermal mass to adjust the heating profile according to the solder being used. There's a good video of Chris talking about it here.
The rest of the floor is filled with carts of finished boards waiting to be tested and shipped out.


All and all, a super interesting visit!
Two Weeks, Lessons Learned
The past two weeks have been packed - the Public Radio is in full swing, and my permanent installation with Studio Indefinit is going up at Antfood Studios in two weeks! Since finishing SFPC in mid-December, these two projects are pretty much accounting for all of my time, outside of looking for a job :). I've learned a lot of small things preparing for both of these projects in the last few weeks, some dorky, some pretty interesting.
Public Radio
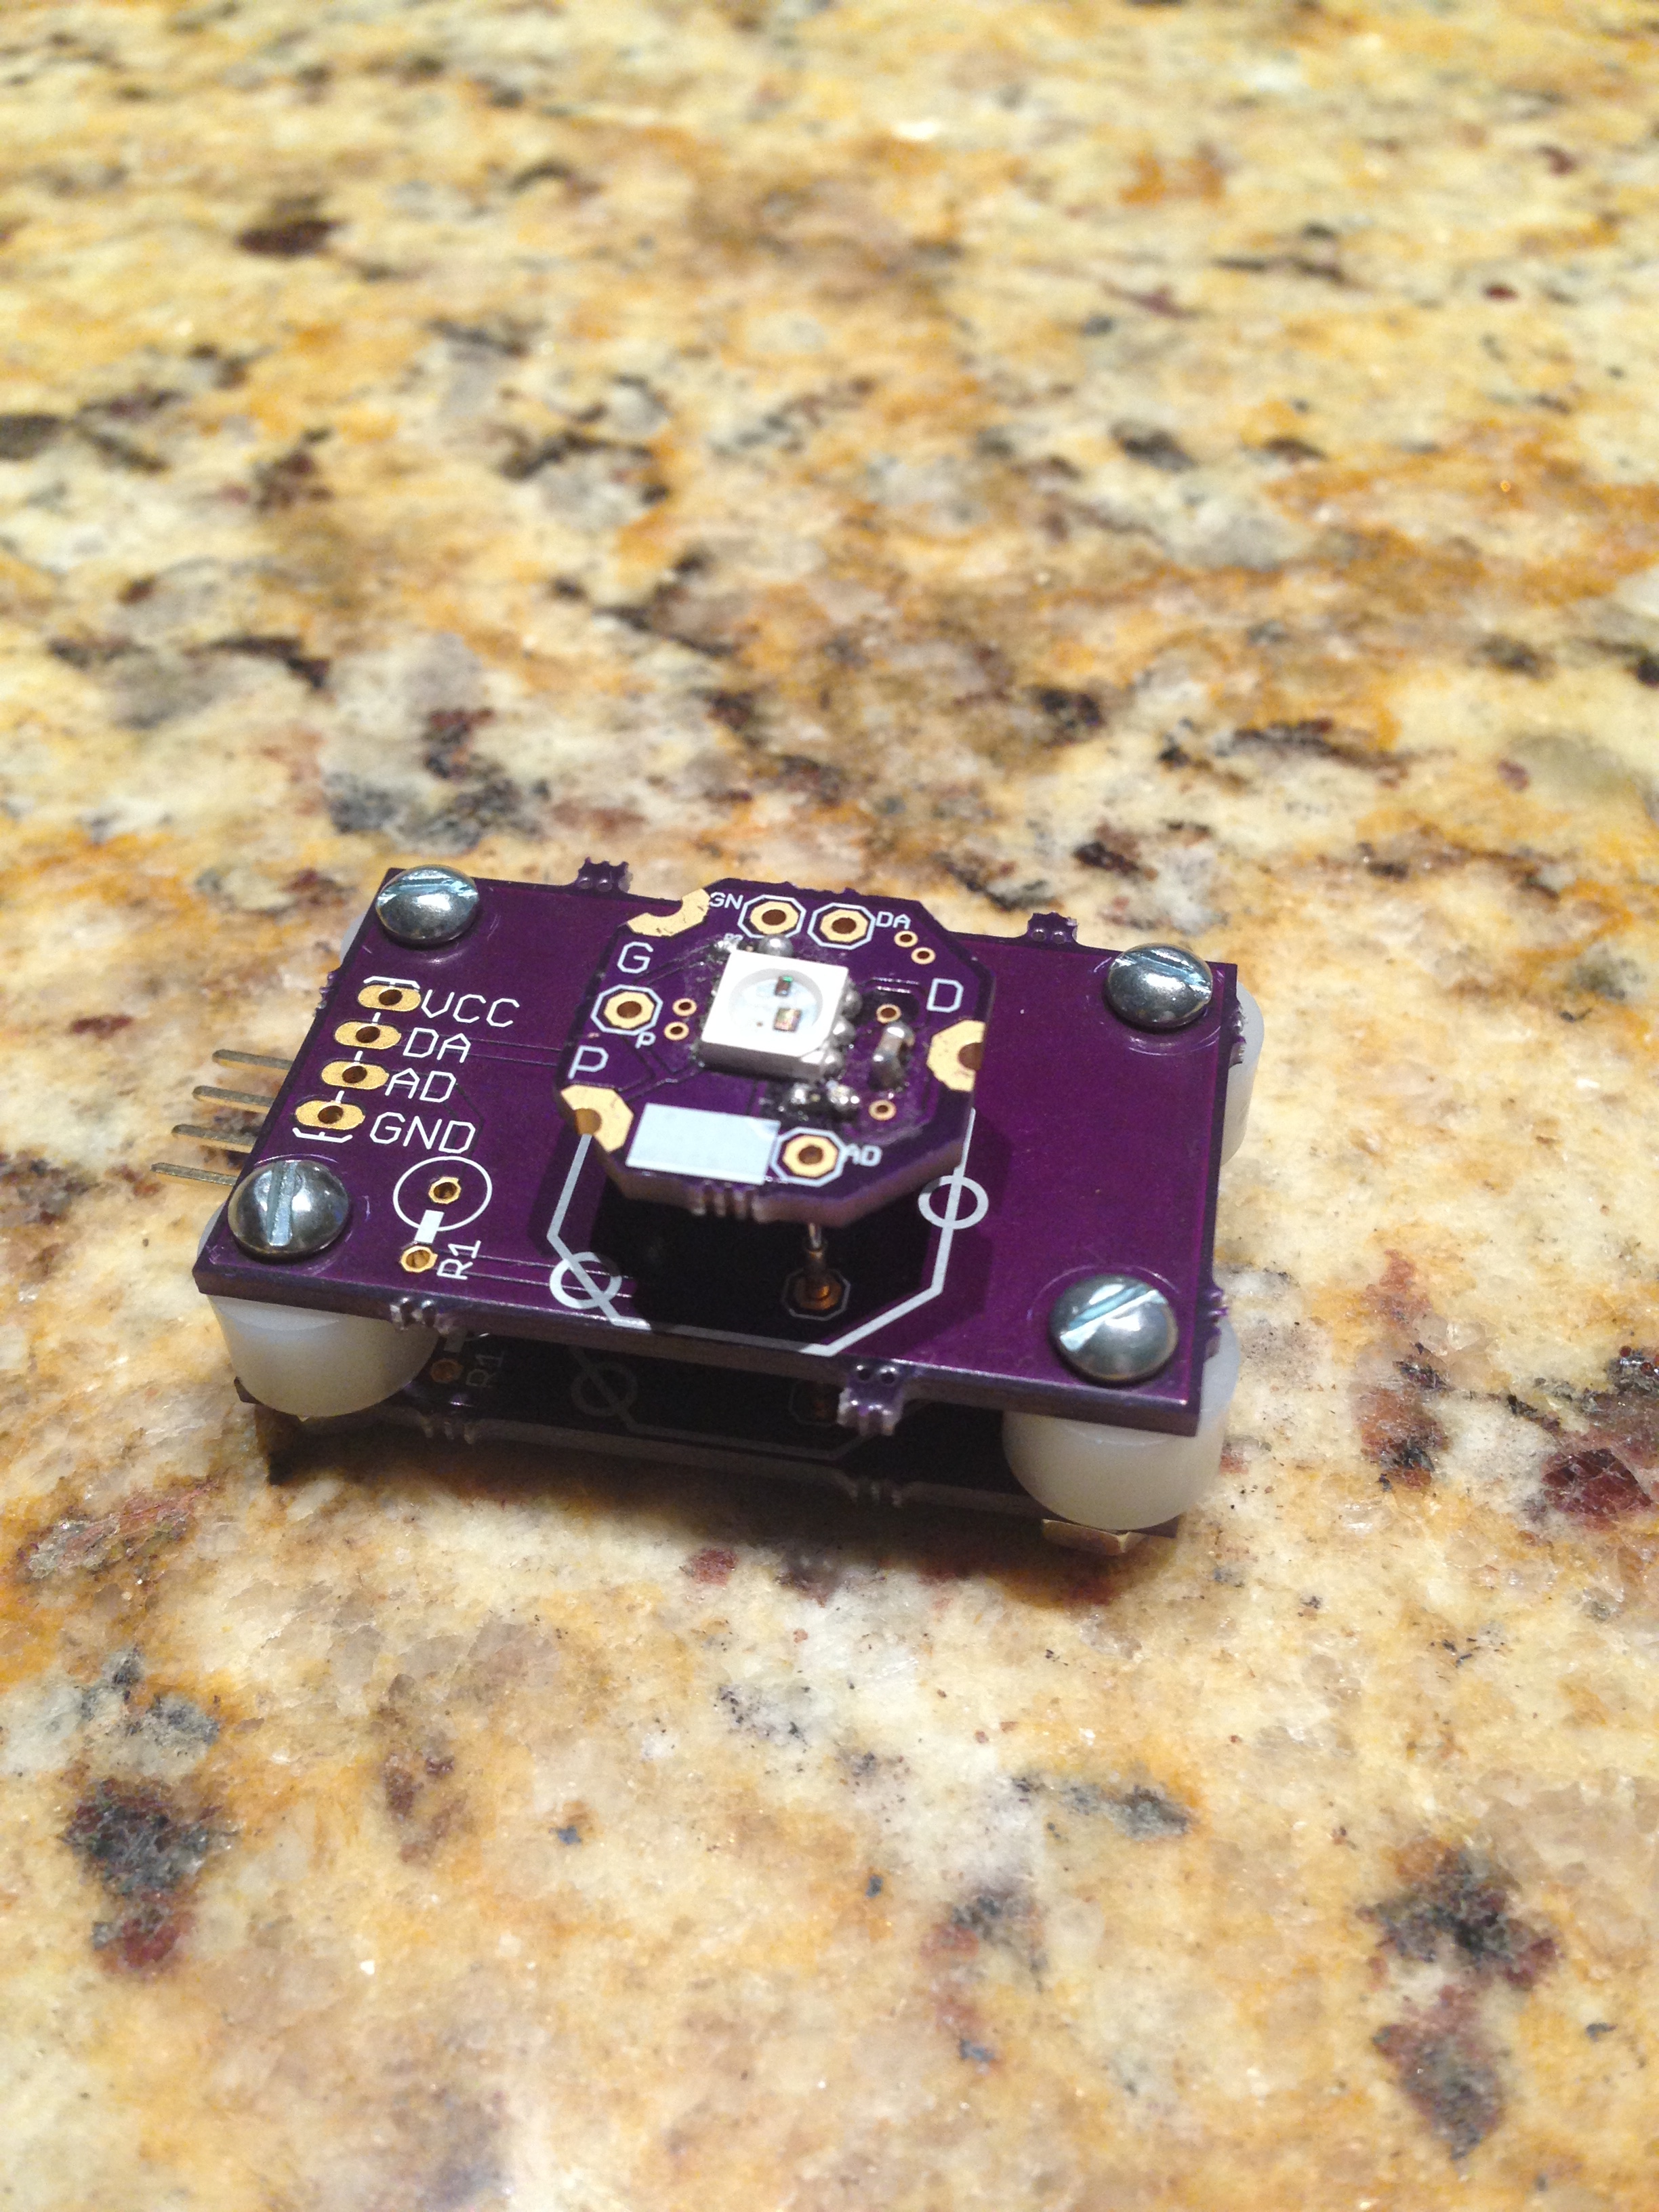
Spencer and I, along with Andy Warner spent the beginning of January designing a development board for the Public Radio. We received the assembled boards back two weeks ago, and the short story is that they check out, and more importantly are serving their function as testing PCBs.
All of the components we are interested in testing were spec'd at a minimum 0805 package size, and there is plenty of room on the board for rework. The boards were produced by Worthington Assembly this time around (they have been amazing to work with - these are the same guys that manufactured Tessel).
There are two notable changes to this version of The Public Radio:
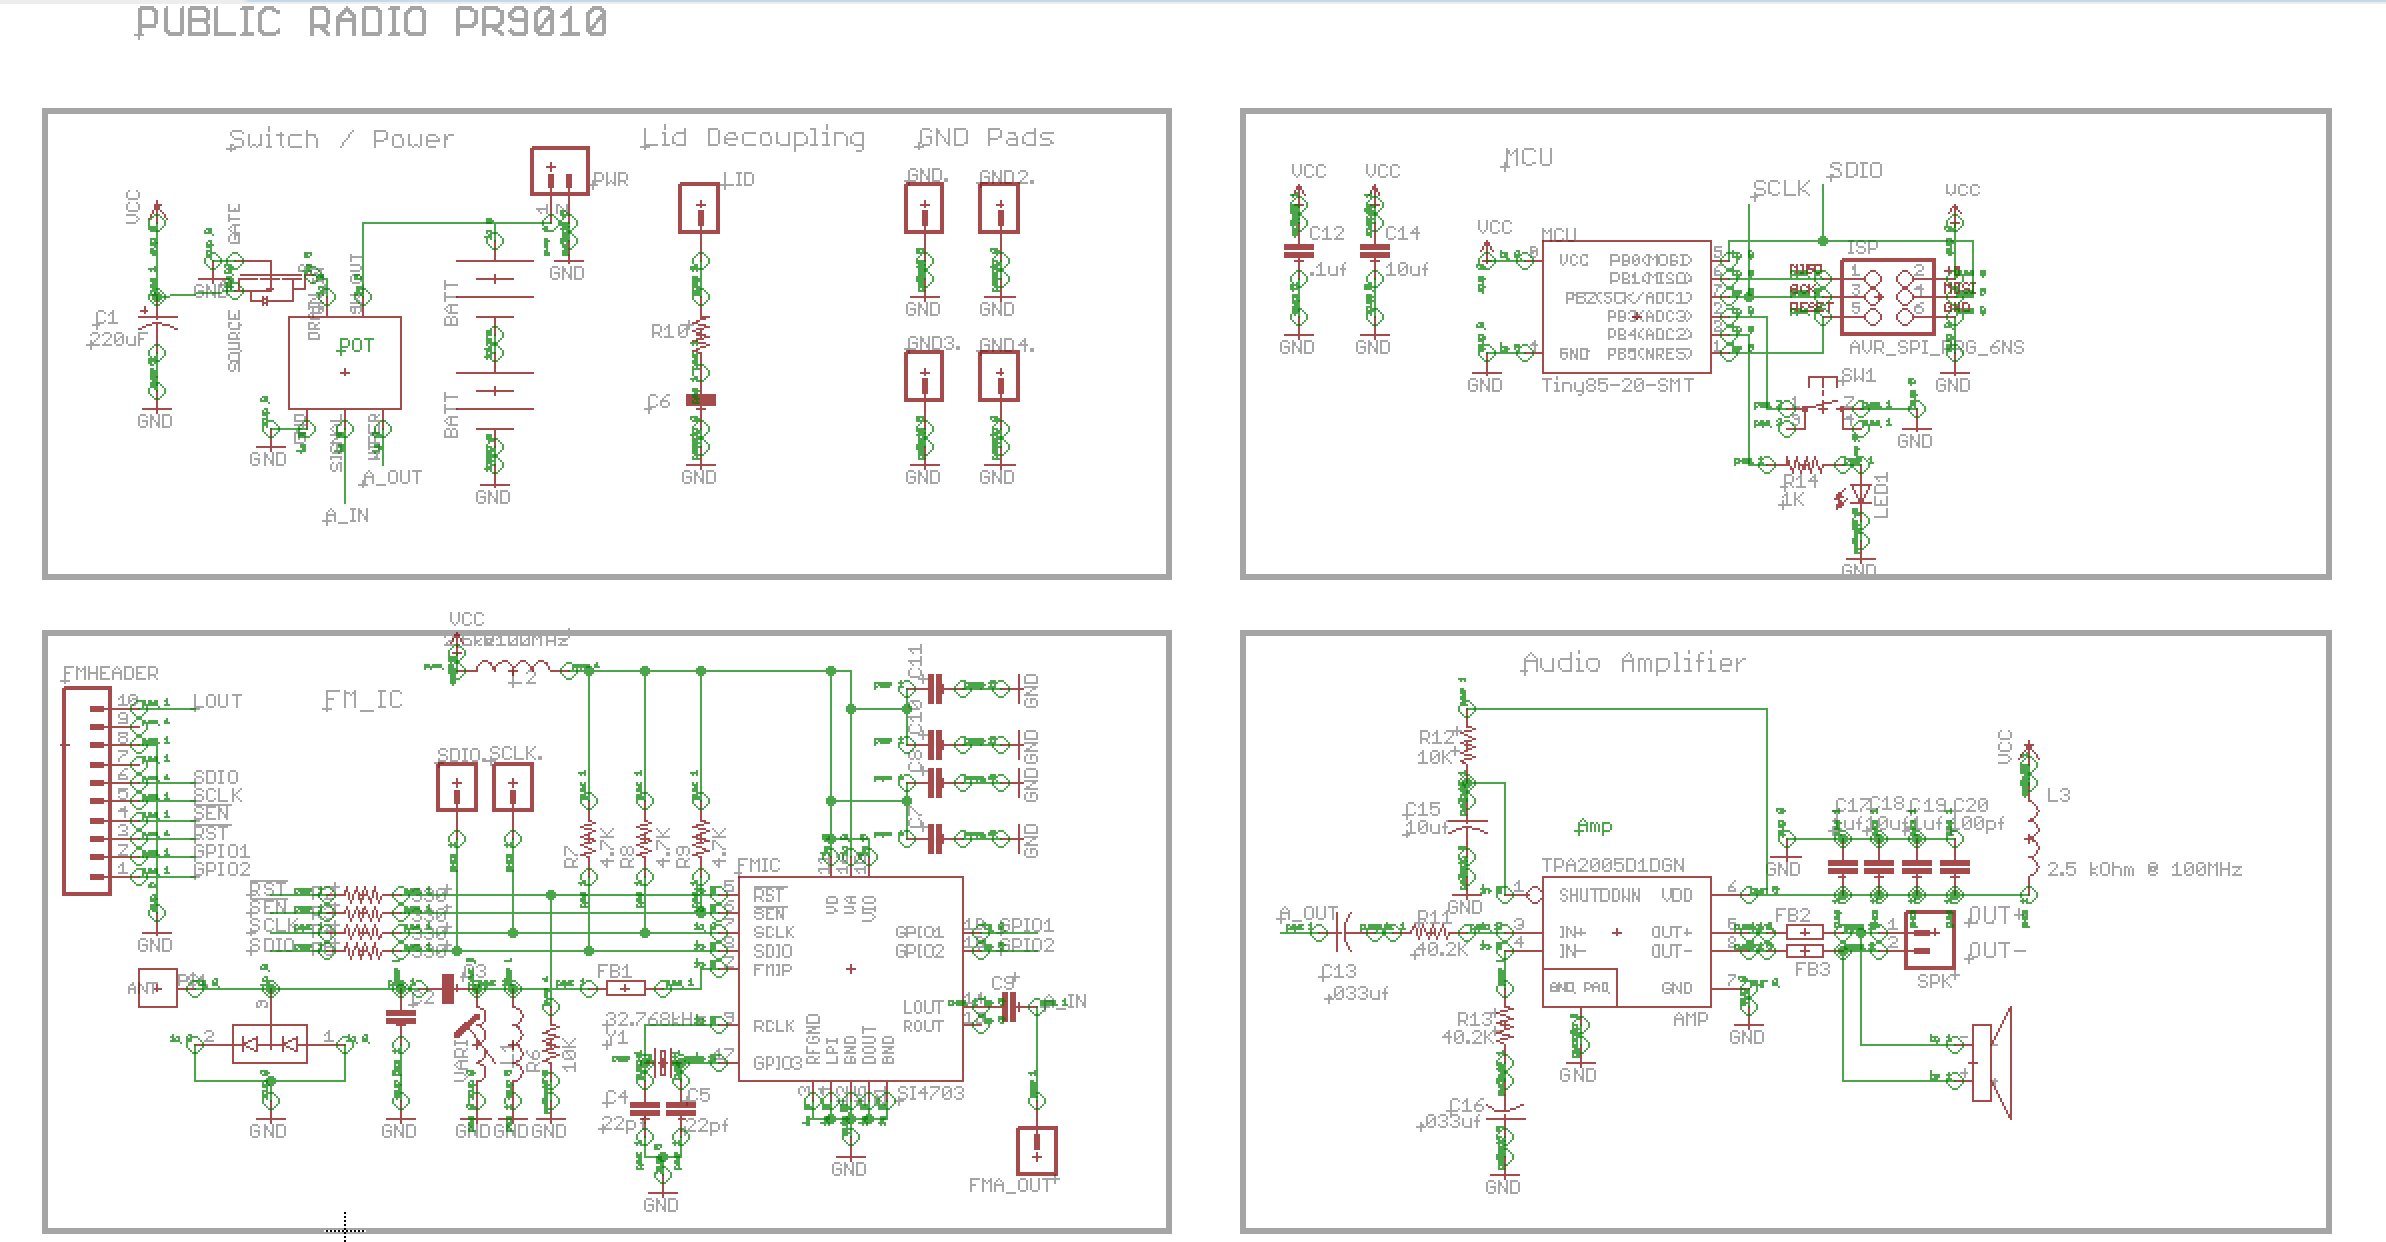
- It's all digital, we're implementing the SI4702 and an ATTiny45.
- There's a UI to change the station in case you move.
Lessons Learned
- Don't trust random packages in an Eagle library you pulled down from the web, duh.
- Don't use the dimension tool in Eagle, it straight sucks.
- Do orient your board at the origin and 'cmd-I' an item to get its exact coordinates.
- CrossPack is an awesome tool for working with AVR on a Mac!
- Programming with AVRDUDE from the command line is fun!
- Don't underestimate the importance of combing through your BOM multiple times with at least two people, before sending it off to your assembly house. It takes a lot of attention to get it right.
- Chinese New Year is a thing in February - everything shuts down, plan for it!
- The Octopart BOM tool seems interesting - Spencer is dying to use it.
- Exporting X/Y data from Eagle does not leave you with a clean CSV, you'll have to format it.
- Going to 0402 is cool, I guess, but it also means you'll have a slimmer selection looking for components, and your footprint becomes pretty important (see below).
- Traditional squeegee silkscreens get wonky when you go smaller than a 30X40 Mil size and 6 Mil draw weight. Who knew!
- Reach out to your suppliers for design reviews, it's is really nice to have that support.
- Putting small vias in a pad is a thing, and you need to check with your manufacturer about it. In our case it means having no soldermask around the vias in the pad of our IC to prevent tenting.
- Make your own hot keys for Eagle, it makes all the difference.


Last night we sent off the next spin of the Public Radio, shrinking everything back down to its original size.
Custom Lights
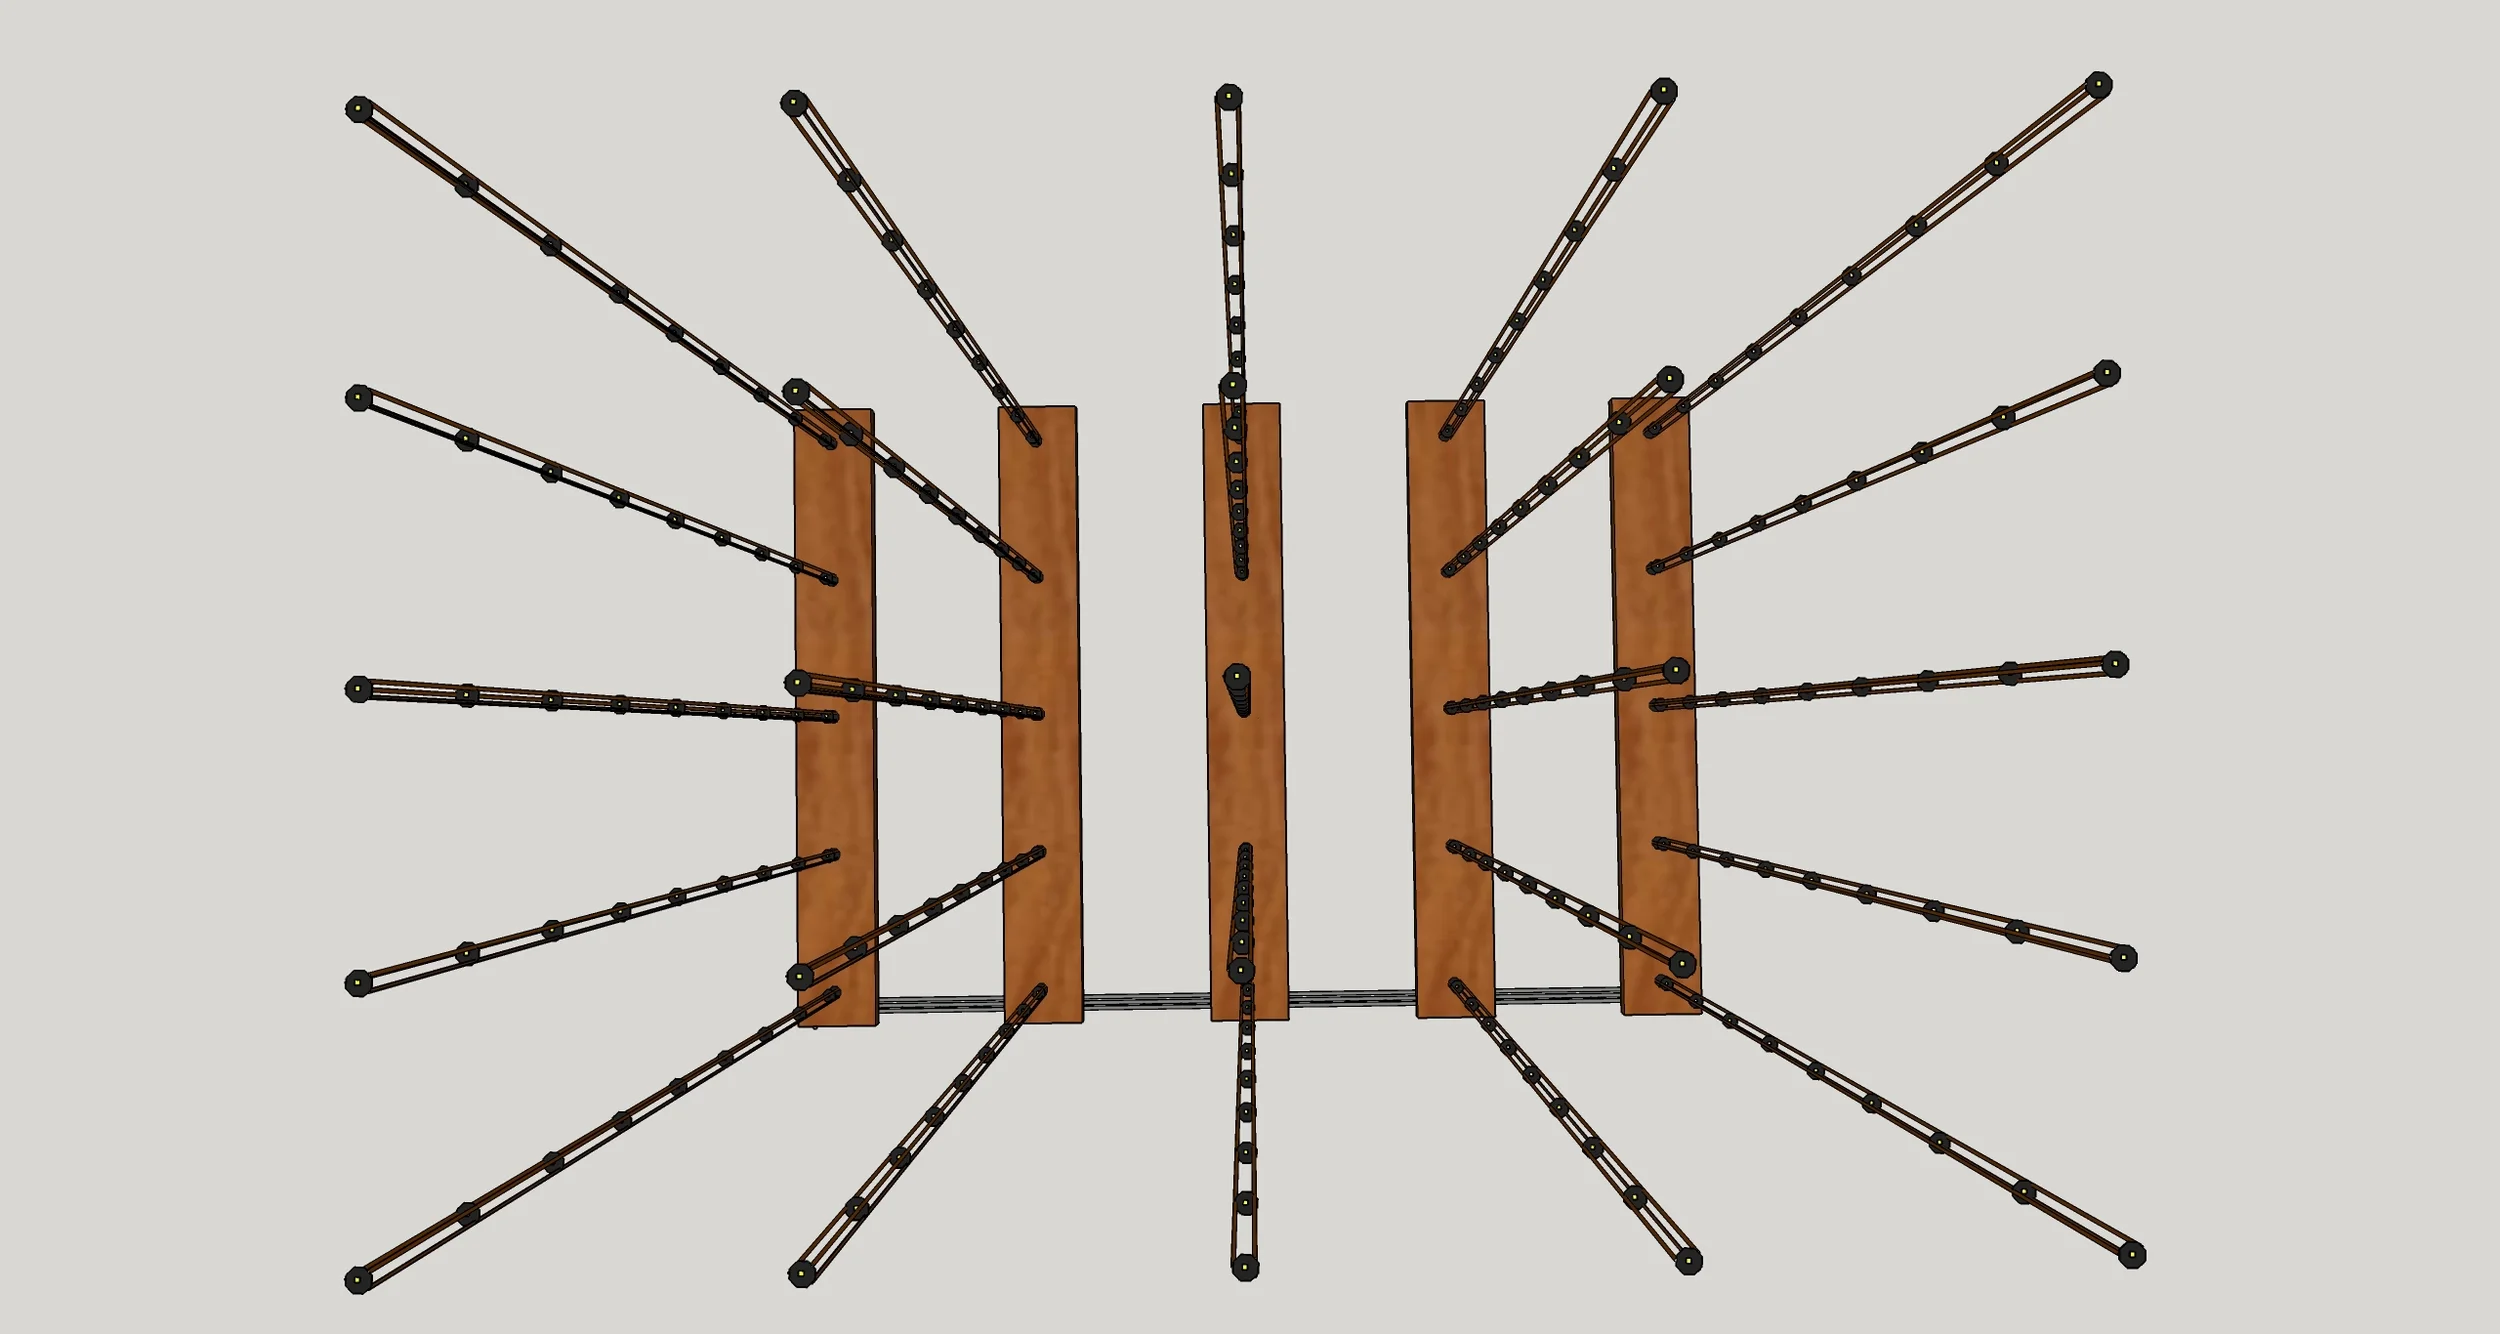
700 PCBs, 1400 addressable DMX LEDs, suspended with copper ropelay
Last friday, I received the first sample run of a custom double-sided DMX lighting fixture I designed and iterated over this past fall and winter. Drinks were had! (once I tested them..)
These tiny guys were routed AND assembled by PCB Cart. A couple notes on PCB Cart:
- They were generally easy to deal with - you can pay via paypal, and they take your Eagle files.
- Their english is fine, and they were very responsive (<24 hrs, always).
- Their price was scary how low it was, honestly, still holding my breath for the rest of the order to check out.
- I totally recommend them for projects on a budget.
- They dealt with the edge pads just fine, for an additional fee of $70
Because every fixture in the installation is addressable, each PCB has to be flashed with an address before it gets wired up. I've spent a bit of time the past couple weeks honing in the plan for our fabrication process next week, which will involve a few different jigs. One of them is a simple hardware pogo pin jig, running some modified code from Matt Mets on an Arduino, and a processing GUI I wrote to make the serial monitor a bit easier to look at when programming hundreds of these things.
My previous pogo pin gig used a second PCB to shroud the pogo pins, this time I'm using a simple 3D printed fixture. The process for programming is: place the board on the pins; watch the lights blink R/G/B/W; hit space bar to increment and set the address; watch the lights go white.


Most of my responsibilities, outside of general concept design, on this install have been designing and sourcing most things electronic - PCBs, wiring, breakout boards, terminal blocks, wire harnesses, test fixtures as well as some simple code for testing PCBs while on the workbench. I've come across a couple interesting suppliers outside of PCB cart:
Squires Electronics
- These guys make custom wire assemblies. Everything from full on wire harnesses, to bundles of pre-cut, stripped and tinned wire. They're awesome, and really easy to work with.
Alibaba
- Okay, this is obvious, BUT, the Alibaba chat feature is underutilized (at least it was for me) and allowed me to get quotes quickly and have 'interesting' conversations with suppliers.
Samples and bulk items:


Yesterday, Dave and I mocked up a volumetric version of the installation to test our power supplies and confirm voltage drops across the the piece.


Lessons Learned
- You can always get better at accounting and keeping track of expenses on a project like this :)
- PCB Cart = pretty decent option.
- Euro style terminal blocks are way better than blocks like this.
- Makerbots do not print 1 mm drill holes reliably.
- Makerbot website kind of stinks.
- Wire ropelay is a beautiful material and surprisingly affordable!
- Non centered filament placement within an led fixture is actually noticeable.
- WS2822s is a nice component, but the documentation is thin, and not many people outside of Ebay and Alibaba stock them.
Making a Pogo Pin Jig
Making tools is fun.
I'm gearing up for an installation next month, and part of the process means coming up with a way to flash about 800 tiny pcbs with a DMX address. I've never worked with pogo pins before, but they're totally great for this application, and the board I just designed seems to work pretty well.
The idea is that you're making a temporary electrical connection to the PCB - just long enough to flash some code and run a simple routine to make sure everything works, before assembly.

Luckily for us, Blinkinlabs and Matt Mets (who's been an awesome help) have used this particular DMX LED in their Blinky Tile project. Their modified DMX simple library and code to talk to this particular LED driver is on Github, and seems to work great for us! I ever so slightly changed their code to work better with our plans for testing and fabrication. Namely, that the code cycles R/G/B at first, so we can rule out any problem boards, and then simply hitting space bar increments the address number to make it easier for us, as we sock through 800 of these things.
For this particular project, the routine will be:
- Take an assembled PCB (each contains two LEDS) and place it on the pogo pins.
- Check that it's red, green and blue channels work on both sides.
- Program the address onto the board - this targets both LEDs, and causes them to go solid white.
- Number the board, and it's ready to be soldered in place.
Here's it in action...
I'll be redesigning the jig slightly so that it contains three PCBs. One on the bottom that makes an electrical connection with the headers and pogo pins, one in the middle which supports the pogo pins and spaces the boards (these two are what I'm using now), and finally, one on top with a cutout in order to index the PCB I'm flashing on the jig itself. At that point I'll probably mount the whole thing onto a larger piece of perfboard or wood to keep it from sliding around.
It'll be fun, but definitely a lot of work.
Models, Planning and Small PCBs
This week I refined the model for our upcoming installation. This first set of images shows a single DMX universe, which will allow for the individual control about 170 PCBs with two lights (top and bottom) on each. For each of the six universes there will be a single 5V 10A power supply and ethernet buffer card supplying the data line.
Dave and Gabe have, among other things, been sourcing reclaimed wood to make up the roughly 34 ribs to support 5 LED strands, bus wiring, terminal blocks, and mounting hardware, most of which is detailed below.


The Studio Indefinit crew iterated on our jig hardware, 3D printing half a dozen or so blocks to hold the pcbs in line while we solder the wiring in place. This has proved to be an extremely crucial part of the project to help maintain the integrity of the installation's geometry during fabrication next month.
AND at the same time Kevin has been working up the software, creating a voxel animation simulator, which will allow us to overlay his LED animation models in Cinder onto our Rhino models of the install.
More to come...


Public Radio Development Board
The past 10 weeks at SFPC I've majorly been in the back seat with the Public Radio - Spencer has been leading the way doing an amazing job. Most of my efforts the past few weeks have been devoted to electrical engineering: redesigning our schematic to incorporate an MCU and new FM chip, and laying out a development board to test our new design. Andy Warner has been a major help advising along the way. Here are few pics from the process.


Turn Signal Phasing
An experiment with capturing phasing patterns from a car's turn signals, by grabbing the timing functions from a processing sketch and later using them for playback with a standalone LED fixture.